

Bây giờ mới đọc bài này, tiếc quá ko được test. Tổng thiệt hại thế nào hả lão xương hom?
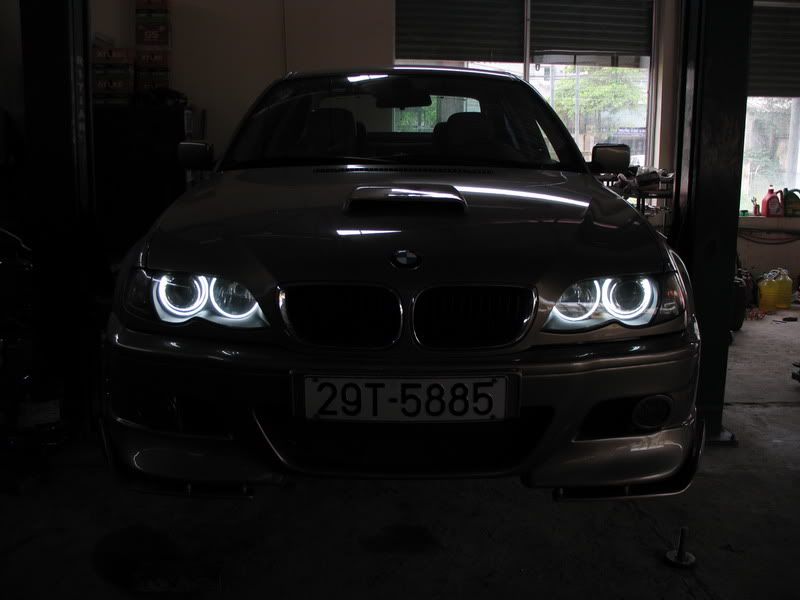
[Thảo luận] Gắn đèn Angel Eyes thực tế chứng minh
- Thread starter Chuoiday
- Ngày gửi
Tổng thiệt hai như sau:
1 bộ Angel eyes 7000K E46 Made in Germany: $120
Công Tháo lắp đèn pha LAC: $10
Công cắt viền nhựa đèn Angel eyes: $0 Nakio
Công đấu ballast vào đèn Position: $0 Minhkhoi
---------------------------------------------------
Xin chân thành cảm ơn các bác mục 3, 4
Còn BMW E46 318i từ mục 2 đến mục 4 tổng thiệt hại $3
Ổn đấy ông ẻm ạ(y) (y) (y) (y)
vodca cho ông em phát
vodca cho ông em phát
Các bác nhớ vote cho người chụp ảnh đẹp cái nhá!
cvn nói:Các bác nhớ vote cho người chụp ảnh đẹp cái nhá!
Anh Cườn chụp bằng điện thoại hay sao ý nhẩy
)")
Chụp bằng O2 Exec đấy!vunhat nói:Anh Cườn chụp bằng điện thoại hay sao ý nhẩy

Thế thì phải vote - thôi
Lúc đấy chụp nhục vật vã vì không có chân máy, định ới bác Vunhat đem quả chân xịn ra để chụp.
zippo nói:Lúc đấy chụp nhục vật vã vì không có chân máy, định ới bác Vunhat đem quả chân xịn ra để chụp.
Sao ko để máy lên nóc capo mà chụp có hay ko?
Em phải nằm lăn kềnh ra đất cho bác cvn đặt máy lên mông để chụp vì lúc đấy đi ra có mỗi con xe em thôi
- Biển số
- OF-20
- Ngày cấp bằng
- 22/5/06
- Số km
- 1,928
- Động cơ
- 602,414 Mã lực
- Tuổi
- 47
- Website
- dochoixedap.com
lihai lihai,ok
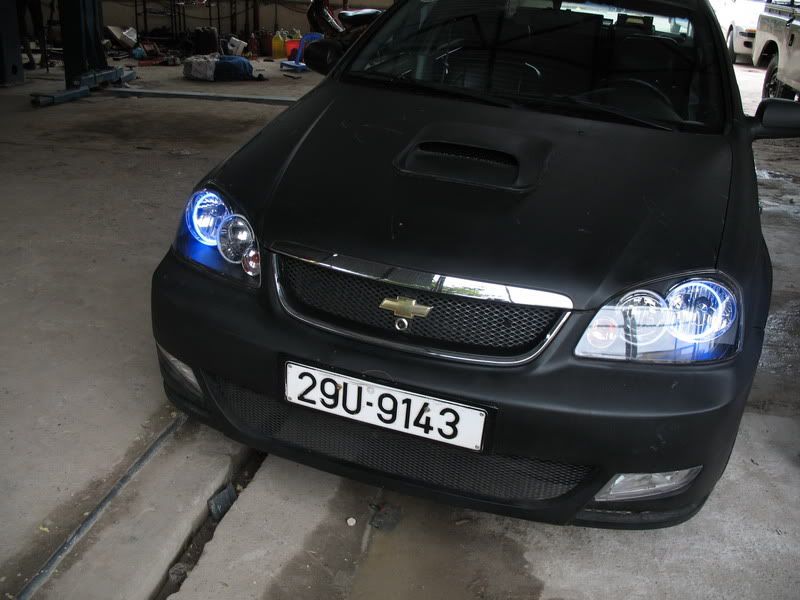
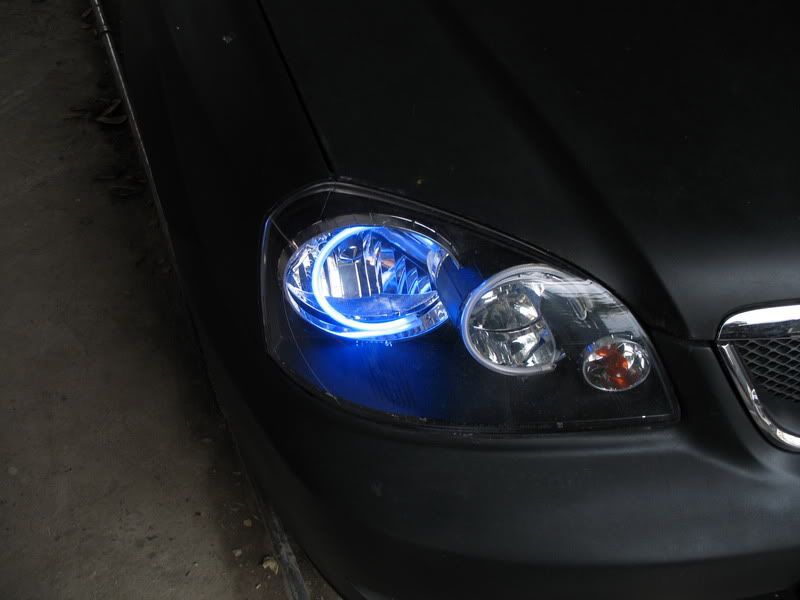
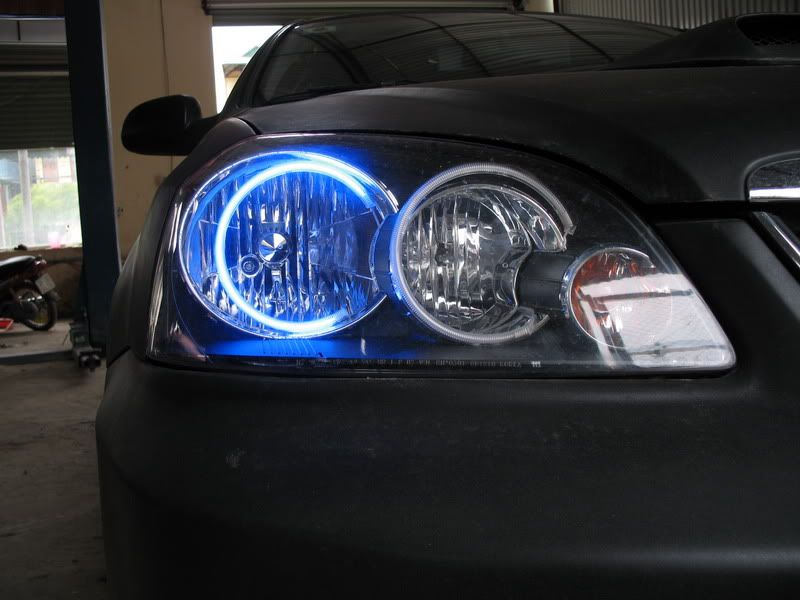
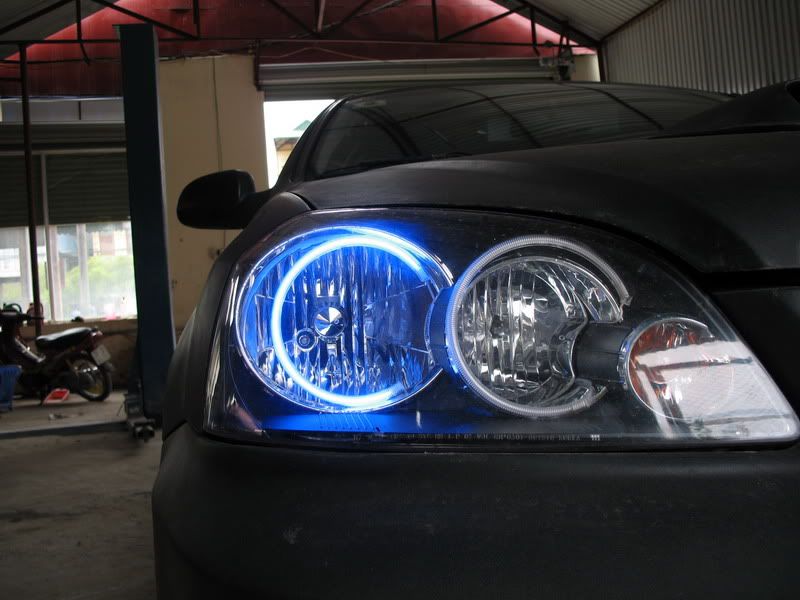
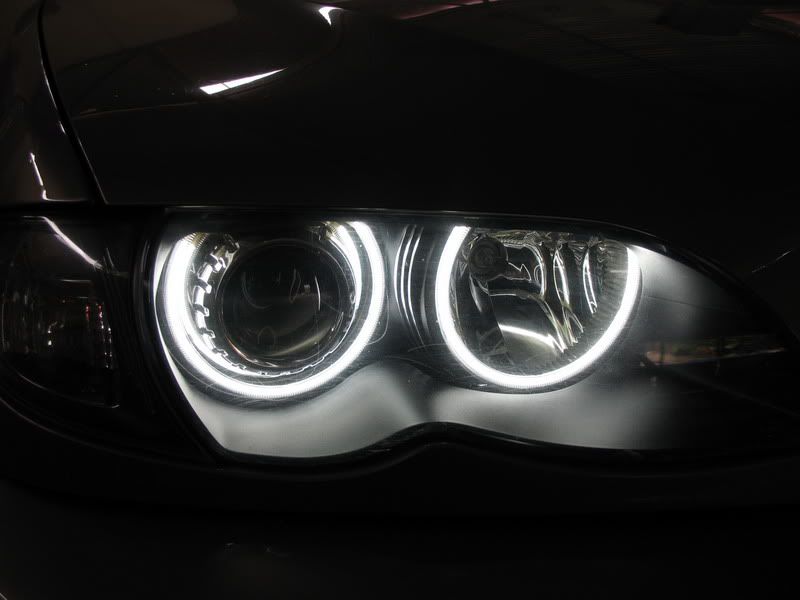
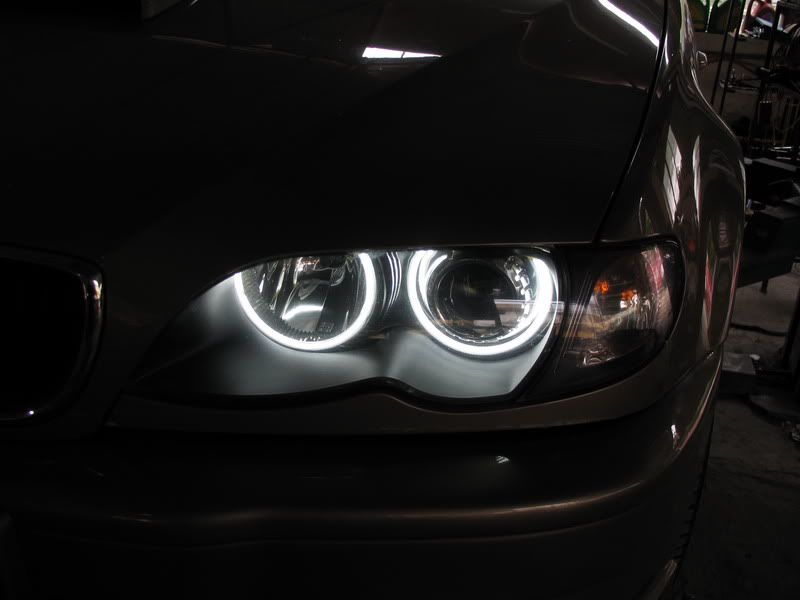
Thêm 1 chút ảnh do thợ tay nghề cao chụp bằng máy lởm, mời các bác so sánh với mạy xịn chụp bằng thợ lởm
Lacetti

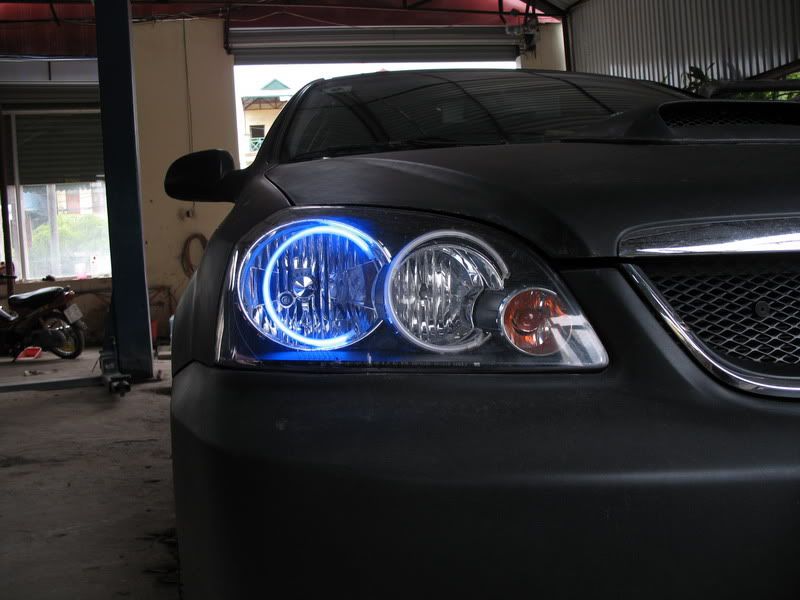
Sontt BMW, lắp phát vừa luôn
Lacetti
Sontt BMW, lắp phát vừa luôn
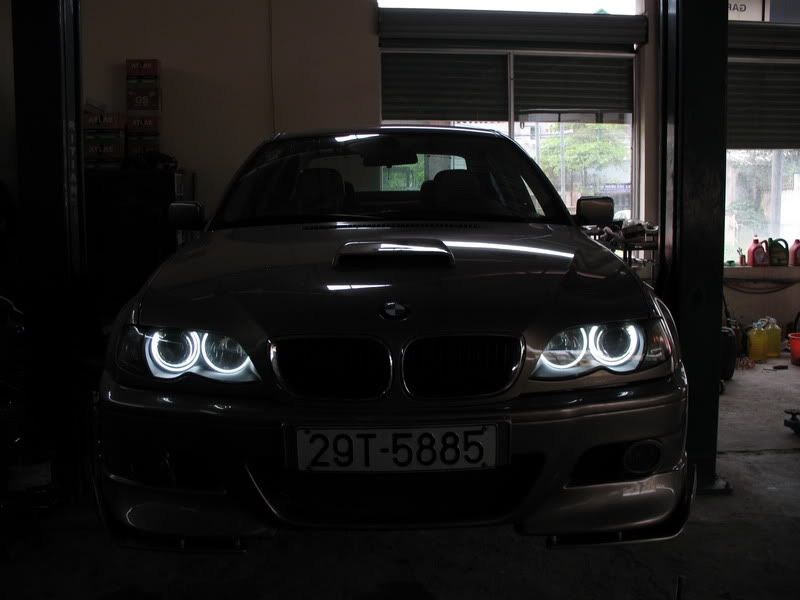
Zippo ơi, gỡ mấy cái ảnh xuống đi không anh em chê cười! Tôi đã phải cố tình chụp khi trời tối để tăng sự lung linh của cái đèn, còn bác thì lại đi lột truồng nó ra thế? Tiếc thay,tiếc thay!!!! :'( :'( :'(
- Biển số
- OF-22
- Ngày cấp bằng
- 22/5/06
- Số km
- 7,682
- Động cơ
- 1,145,441 Mã lực
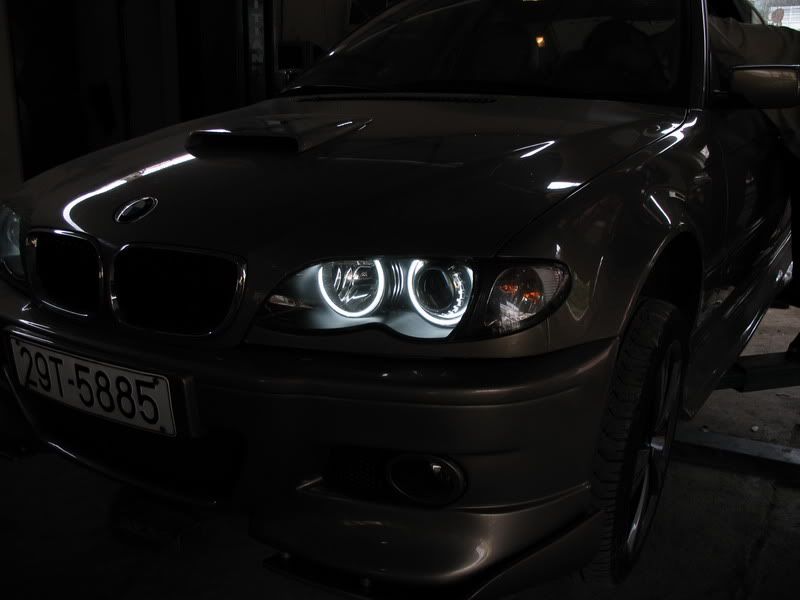
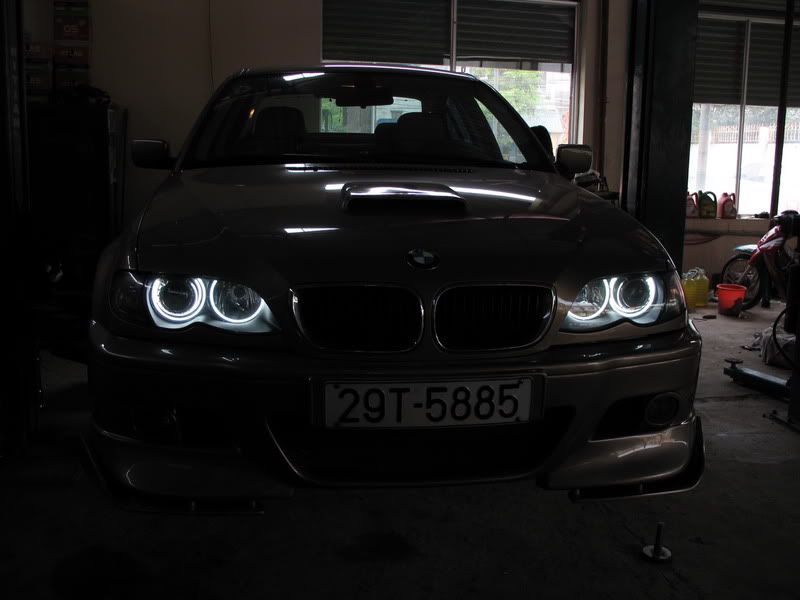
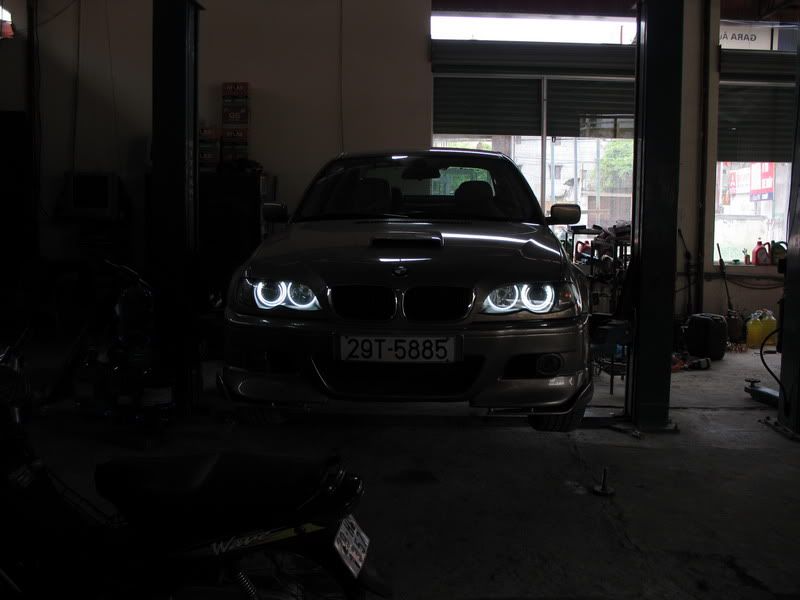
BMW lắp Angel Eyes trông ngon nhể, đúng bộ của nó có khác ... ớ nhưng cho em hỏi tại sao xe của bác Mypt lại sáng có mỗi 2 cái đèn thôi nhể, bật 1 phát cả 4 cái sáng thì mới đúng nhể
- Biển số
- OF-22
- Ngày cấp bằng
- 22/5/06
- Số km
- 7,682
- Động cơ
- 1,145,441 Mã lực
Lắp Angel Eyes cho Mazda 3 (tây nó làm ko phải em)
Em thấy Angel Eye có vẻ hot search thấy 1 bài cũng hay hay nên post lên cho mọi người tham khảo (ngại dịch quá nên em phang luôn tiếng Anh )
Nó tháo đèn khác bác Mypt nhà mình là nó cho vào lò nướng
-------------------------------------------------------------------
This is an installation guide for this kit for the Mazda3 sedan and hatch:
http://www.umnitza.com/product_info....roducts_id=278
This guide will guide you through installing the kit wired up to your 12v ignition so that you wil have them setup to run as daytime running lights.
If you see any errors report them to me and I will do what I can to fix them up.
Tools required for the install:
8 mm and 10 mm socket wrench
Phillips and Flathead screwdrivers
Wirestrippers
Electrical tape
CLEAR-DRYING Silicone sealant
Drill (if you wish to drill through the battery box)
Needle nose pliers
Time Required: Give yourself at least 4 hours, the more the better.
PSA: Test the halos before you start with the installation process. Connect the harness to the ground, the power wire to the batter. Insert the halo power wires into the ballasts temporarily (NOT using the black plugs) and connect the ballasts to the power supply. Touch the remote wire spade to the positive part of the battery and the halos should illuminate. If they only come on half way, reverse the way the wires are inputed into the ballast. If there are still problems, contact umnitza - you might have a problem with the halo.
Part 1: Bumper Removal
To remove the bumpers we have to separate it from the the undershield of the vehicle. Using a phillps screwdriver or 10 mm socket wrench remove the bolts underneath the bumper until the bottom of the bumper is free from the vehicle.
Remove the top connections of the bumper, the bolt and the hood stop. Removing the hood stop takes a bit of prying, so just work at it a little.
There is a bolt behind each fender holding the bumper on. To access these 8 mm bolts, we have to remove the plastic screw holders in the wheel well holding on the splash shield. After the screws are removed (3 of them on each side) pry back the splash shield and look up into the fender near the seam line. Use your socket wrench to loosen this bolt and the bumper should be ready to come free.
The foglamp wiring is holding the bumper to the car still. Use needle-nose pliers and pull out the wire holder from the bumper. Disconnect the foglamp termainal and pull the bumper free from the vehicle.
This is the separated bumper from the vehicle.
Part 2: Headlamp removal
The headlamp is held on with a series of bolts and plastic screws. Remove the headlamp assembly with the plastic frame all at once after you have removed all the bolts and screws.
There are three bolts holding on a plastic frame to the headlamps. Remove the bolts to remove the frame.
Disconnect the bulbs plugs for the highbeams, lowbeams and parking lights.
Being very careful NOT to touch the bulbs, pull them out. The parking and highbeams come out with a twist. For users with HID, unscrew the plastic cover, pull down the metal retention clips inside the housing. The bulb has a bottom holder to it. Pull this out (the retention clips fit around it, so get the clips off of it) and turn the HID bulb and remove it from the holder.
Those with HIDs must also removal the ballast. There are 3 phillips head screws holding it on. Unscrew and then remove the wiring harness from the ballast.
Part 3: Headlamp Baking

This is the headlamp ready for baking. Preheat the oven to 200 degrees and place the headlamp on a cookie sheet to be placed into the oven.

Place the headlamp into the oven, being careful not to touch the sides. Heat the headlamp in the oven for around 15 minutes to start out. This worked perfectly fine for me and was easy to work with at this temperature and time.

Remove the headlamp from the oven after 15 minutes (USE OVEN MITTS! LIGHT IS HOT!) Depending on your tolerance for heat, you might be able to handle the lamp after it is out of the oven with your bare hands. Use a flat head screwdriver and bend all the plastic clips that are holding the headlamp on up enough so that they will not catch when you pull on the glue. Using a flat head if you have one, stick it into one of the corners of the lamp (I recommend the bottom corner, under the lamp so you will not see any bent plastic if things go wrong) and start prying the lamp apart. This is a process that takes a lot of patience and you just have to work at it for a while. As you begin to pry it open, use a box cutter or other sharp blade to cut the glue; this will keep it from going everywhere and make it a lot easier to pull apart. Continue pulling apart the lamp until you have it totally separated. The glue is sticky so be careful not to get it everywhere. I had no problems with it getting messy, or sticking to other parts of the assembly, but just be cautious.

The headlamp is now in two pieces. We now need to separate it into three. There are two screws on the bottom of the light holding the clear shield to the middle housing. Remove these screws and separate the lights into three peices.

Congratulations, you've just completed the scariest part of the install.
Part 4: Halo Installation
WARNING: The halos are VERY fragile. Under NO CIRCUMSTANCES BEND THESE HALOS. Take your time with this step as mistakes can be very costly and hard to fix later. This is not a hard process, you just need to take your time and be gentle (overly-gentle?) with the halos.

Prep the headlamp assembly for installation. Remove the rubber ring on the back of the bulb so that we can run wired through the high beams.

First we will do the high-beam halo. There are two plastic clips that clip onto the lamp reflector as shown. Be very careful placing these, keeping things even between the two sides when you are pressing them in. Moving these around is where I broke my first high-beam halo. The plastic clips can be pushed in nearly all the way. The top of the halo will sit forward a little farther than the bottom of the halo as can be seen in the following picture:


Using silicone sealant, take a toothpick and place some on the bottom of the halo where it touches the reflector. This will keep halo in place and not allow it to bump around when driving. The plastic clips do not need this.

Run the wires for the halo through the back of the housing, and reinstall the rubber ring that we removed in the first step like pictured. Congrats! 1/4 are done.

Installing the low-beam halo is a little easier. Play around with the position of it on the ring. It will NOT fit entirely centered over the reflector as you can see in the picture. Don't panic, this is just how the kit is. Apply silicone as you did with the high-beams to any areas that touch the reflector. This is required to keep the halo in place.
YOU DO NOT WANT TO RUSH THESE STEPS, TAKE YOUR TIME!

This is how the wires will look coming out of the rear of your completed lamp.
Part 5: Putting the Headlights Back Together
Before you go on: CHECK FOR FINGERPRINTS! Check all black pieces, all chrome pieces, especially the projector lens. Go over everything at least twice. You do NOT want to find an errant fingerprint after things are sealed back up and installed. It WILL big you for the rest of your life.
Screw the clear cover back onto the bulb housing.
Place the two pieces of the headlamp back into the oven and bake for 15 minutes. Take the two pieces, align them up and press them back together. This is very simple and things should seal perfectly. The headlights aren't 100% sealed either so you should not have to worry about condensation in the lights or water getting after resealing them like this.
Place all the bulbs back into the completed headlamp, reversing the steps you used to removed them. Pay attention to the HID bulb as it has to go in a certain way and the tabs have to line up with the electrical connections.
For the HID cover, hold the wires at the top of the hole and put the cover on. You won't be pinching the wire, so don't worry.
Reinstall the ballast onto the headlamp and it is now ready to go!
Part 6: Wiring
The fun begins. The kit includes 2 ballasts and a wiring harness. This is what we will use to get power to the DDE Halos.

Place the relay on top of the factory ground on the right fender wall. Ground the DDE kit there as well.

For my install I drilled a hole in the battery box. I then filed it out a little so that the yellow power wire would fit through. Connect the yellow power wire to the battery terminal.

Because how things are connected, I am wiring them up to a 12V Ignition spot so that my lights come on as daytime running lights. You can wire them up to come on however you want. It just depends on whether or not you want to put in a switch and which wire you tap from. The remote wire is in the wrong side of the kit for my use, so I cut off the end of the wire with the male spade connector, and then pulled the wire back through the black compression housing till it was totally out like you see in the picture.

Shorten the wire and reconnect it to the male spade half you just cut off in the previous step.

I had already done the Independant Foglamp Mod so I am tapping that wire with the supplied T-tap and connecting the remote wire to that. This means that when the car is turned on, the remove wire has power and the DDE lights will be switched on automatically. When the car is shut off, they will remain on for around 15 seconds then turn off by themselves.

Running the passenger side harness I ran it along the front of the vehicle. Using zip ties you can see the path that I used in the next couple of pictures.


Connect the ballast to the underside of the light as shown. You must first attach the harness back onto the light before putting the ballast on. The picture doesn't show this, but you will see what I am talking about. The picture also shows how the wires are run with the cover over the HID opening.
Place the included black connectors onto the Halo wire ends. Insert the wires with the metal tab UP into the opening the black connector. (You will see how it fits.) The wires have no polarity, so it shouldn't matter which side you connect them into. Connect the black connectors together and then connect the ballasts to the power supplies. You have male/female plugs for these and it should be fairly easy to see how they fit together. Connect everything like you did when you tested the bulbs.
You did test the bulbs, right?

Here is a picture of the headlamp back into place with everything connected up. You can go ahead and test everything by turning on the ignition. Everything SHOULD light up fine. If not ... you need to go through and check all your connections and make sure that everything as it should be.
Part 7: The End
You have all the electrical connections done, it is time to put everything back together. Reverse the steps you did to remove the headlamps, the headlamp plastic frame, and the bumper. Once you are all done with that, sit back and enjoy the work you just did.
Here are pictures of the Thinlines installed on my 3!


Hopefully this guide was some help to you. As it has been said, let your brain process the guide, not the guide process your brain. This is an installation tool, you might have a better way of doing things or a minor step might be missing (hopefully not though). Good luck and enjoy your Daylight Demon Eyes!!!
Copy ở đây
(http://www.msprotege.com/forum/showthread.php?t=100957)
Em thấy Angel Eye có vẻ hot search thấy 1 bài cũng hay hay nên post lên cho mọi người tham khảo (ngại dịch quá nên em phang luôn tiếng Anh
)Nó tháo đèn khác bác Mypt nhà mình là nó cho vào lò nướng
-------------------------------------------------------------------
This is an installation guide for this kit for the Mazda3 sedan and hatch:
http://www.umnitza.com/product_info....roducts_id=278
This guide will guide you through installing the kit wired up to your 12v ignition so that you wil have them setup to run as daytime running lights.
If you see any errors report them to me and I will do what I can to fix them up.
Tools required for the install:
8 mm and 10 mm socket wrench
Phillips and Flathead screwdrivers
Wirestrippers
Electrical tape
CLEAR-DRYING Silicone sealant
Drill (if you wish to drill through the battery box)
Needle nose pliers
Time Required: Give yourself at least 4 hours, the more the better.
PSA: Test the halos before you start with the installation process. Connect the harness to the ground, the power wire to the batter. Insert the halo power wires into the ballasts temporarily (NOT using the black plugs) and connect the ballasts to the power supply. Touch the remote wire spade to the positive part of the battery and the halos should illuminate. If they only come on half way, reverse the way the wires are inputed into the ballast. If there are still problems, contact umnitza - you might have a problem with the halo.
Part 1: Bumper Removal
To remove the bumpers we have to separate it from the the undershield of the vehicle. Using a phillps screwdriver or 10 mm socket wrench remove the bolts underneath the bumper until the bottom of the bumper is free from the vehicle.
Remove the top connections of the bumper, the bolt and the hood stop. Removing the hood stop takes a bit of prying, so just work at it a little.
There is a bolt behind each fender holding the bumper on. To access these 8 mm bolts, we have to remove the plastic screw holders in the wheel well holding on the splash shield. After the screws are removed (3 of them on each side) pry back the splash shield and look up into the fender near the seam line. Use your socket wrench to loosen this bolt and the bumper should be ready to come free.
The foglamp wiring is holding the bumper to the car still. Use needle-nose pliers and pull out the wire holder from the bumper. Disconnect the foglamp termainal and pull the bumper free from the vehicle.
This is the separated bumper from the vehicle.
Part 2: Headlamp removal
The headlamp is held on with a series of bolts and plastic screws. Remove the headlamp assembly with the plastic frame all at once after you have removed all the bolts and screws.
There are three bolts holding on a plastic frame to the headlamps. Remove the bolts to remove the frame.
Disconnect the bulbs plugs for the highbeams, lowbeams and parking lights.
Being very careful NOT to touch the bulbs, pull them out. The parking and highbeams come out with a twist. For users with HID, unscrew the plastic cover, pull down the metal retention clips inside the housing. The bulb has a bottom holder to it. Pull this out (the retention clips fit around it, so get the clips off of it) and turn the HID bulb and remove it from the holder.
Those with HIDs must also removal the ballast. There are 3 phillips head screws holding it on. Unscrew and then remove the wiring harness from the ballast.
Part 3: Headlamp Baking
This is the headlamp ready for baking. Preheat the oven to 200 degrees and place the headlamp on a cookie sheet to be placed into the oven.
Place the headlamp into the oven, being careful not to touch the sides. Heat the headlamp in the oven for around 15 minutes to start out. This worked perfectly fine for me and was easy to work with at this temperature and time.
Remove the headlamp from the oven after 15 minutes (USE OVEN MITTS! LIGHT IS HOT!) Depending on your tolerance for heat, you might be able to handle the lamp after it is out of the oven with your bare hands. Use a flat head screwdriver and bend all the plastic clips that are holding the headlamp on up enough so that they will not catch when you pull on the glue. Using a flat head if you have one, stick it into one of the corners of the lamp (I recommend the bottom corner, under the lamp so you will not see any bent plastic if things go wrong) and start prying the lamp apart. This is a process that takes a lot of patience and you just have to work at it for a while. As you begin to pry it open, use a box cutter or other sharp blade to cut the glue; this will keep it from going everywhere and make it a lot easier to pull apart. Continue pulling apart the lamp until you have it totally separated. The glue is sticky so be careful not to get it everywhere. I had no problems with it getting messy, or sticking to other parts of the assembly, but just be cautious.
The headlamp is now in two pieces. We now need to separate it into three. There are two screws on the bottom of the light holding the clear shield to the middle housing. Remove these screws and separate the lights into three peices.
Congratulations, you've just completed the scariest part of the install.
Part 4: Halo Installation
WARNING: The halos are VERY fragile. Under NO CIRCUMSTANCES BEND THESE HALOS. Take your time with this step as mistakes can be very costly and hard to fix later. This is not a hard process, you just need to take your time and be gentle (overly-gentle?) with the halos.
Prep the headlamp assembly for installation. Remove the rubber ring on the back of the bulb so that we can run wired through the high beams.
First we will do the high-beam halo. There are two plastic clips that clip onto the lamp reflector as shown. Be very careful placing these, keeping things even between the two sides when you are pressing them in. Moving these around is where I broke my first high-beam halo. The plastic clips can be pushed in nearly all the way. The top of the halo will sit forward a little farther than the bottom of the halo as can be seen in the following picture:
Using silicone sealant, take a toothpick and place some on the bottom of the halo where it touches the reflector. This will keep halo in place and not allow it to bump around when driving. The plastic clips do not need this.
Run the wires for the halo through the back of the housing, and reinstall the rubber ring that we removed in the first step like pictured. Congrats! 1/4 are done.
Installing the low-beam halo is a little easier. Play around with the position of it on the ring. It will NOT fit entirely centered over the reflector as you can see in the picture. Don't panic, this is just how the kit is. Apply silicone as you did with the high-beams to any areas that touch the reflector. This is required to keep the halo in place.
YOU DO NOT WANT TO RUSH THESE STEPS, TAKE YOUR TIME!
This is how the wires will look coming out of the rear of your completed lamp.
Part 5: Putting the Headlights Back Together
Before you go on: CHECK FOR FINGERPRINTS! Check all black pieces, all chrome pieces, especially the projector lens. Go over everything at least twice. You do NOT want to find an errant fingerprint after things are sealed back up and installed. It WILL big you for the rest of your life.
Screw the clear cover back onto the bulb housing.
Place the two pieces of the headlamp back into the oven and bake for 15 minutes. Take the two pieces, align them up and press them back together. This is very simple and things should seal perfectly. The headlights aren't 100% sealed either so you should not have to worry about condensation in the lights or water getting after resealing them like this.
Place all the bulbs back into the completed headlamp, reversing the steps you used to removed them. Pay attention to the HID bulb as it has to go in a certain way and the tabs have to line up with the electrical connections.
For the HID cover, hold the wires at the top of the hole and put the cover on. You won't be pinching the wire, so don't worry.
Reinstall the ballast onto the headlamp and it is now ready to go!
Part 6: Wiring
The fun begins. The kit includes 2 ballasts and a wiring harness. This is what we will use to get power to the DDE Halos.
Place the relay on top of the factory ground on the right fender wall. Ground the DDE kit there as well.
For my install I drilled a hole in the battery box. I then filed it out a little so that the yellow power wire would fit through. Connect the yellow power wire to the battery terminal.
Because how things are connected, I am wiring them up to a 12V Ignition spot so that my lights come on as daytime running lights. You can wire them up to come on however you want. It just depends on whether or not you want to put in a switch and which wire you tap from. The remote wire is in the wrong side of the kit for my use, so I cut off the end of the wire with the male spade connector, and then pulled the wire back through the black compression housing till it was totally out like you see in the picture.
Shorten the wire and reconnect it to the male spade half you just cut off in the previous step.
I had already done the Independant Foglamp Mod so I am tapping that wire with the supplied T-tap and connecting the remote wire to that. This means that when the car is turned on, the remove wire has power and the DDE lights will be switched on automatically. When the car is shut off, they will remain on for around 15 seconds then turn off by themselves.
Running the passenger side harness I ran it along the front of the vehicle. Using zip ties you can see the path that I used in the next couple of pictures.
Connect the ballast to the underside of the light as shown. You must first attach the harness back onto the light before putting the ballast on. The picture doesn't show this, but you will see what I am talking about. The picture also shows how the wires are run with the cover over the HID opening.
Place the included black connectors onto the Halo wire ends. Insert the wires with the metal tab UP into the opening the black connector. (You will see how it fits.) The wires have no polarity, so it shouldn't matter which side you connect them into. Connect the black connectors together and then connect the ballasts to the power supplies. You have male/female plugs for these and it should be fairly easy to see how they fit together. Connect everything like you did when you tested the bulbs.
You did test the bulbs, right?
Here is a picture of the headlamp back into place with everything connected up. You can go ahead and test everything by turning on the ignition. Everything SHOULD light up fine. If not ... you need to go through and check all your connections and make sure that everything as it should be.
Part 7: The End
You have all the electrical connections done, it is time to put everything back together. Reverse the steps you did to remove the headlamps, the headlamp plastic frame, and the bumper. Once you are all done with that, sit back and enjoy the work you just did.
Here are pictures of the Thinlines installed on my 3!
Hopefully this guide was some help to you. As it has been said, let your brain process the guide, not the guide process your brain. This is an installation tool, you might have a better way of doing things or a minor step might be missing (hopefully not though). Good luck and enjoy your Daylight Demon Eyes!!!
Copy ở đây
(http://www.msprotege.com/forum/showthread.php?t=100957)
Chỉnh sửa cuối:
Lắp vào BMW E46 nhìn đã thật, bác díp pô có kiếm được bộ nào mầu đỏ ko? Em thích mầu đỏ lắp vào E46 nhìn long xòng xọc như mắt bò tót mới đã. Mà mấy cái đèn trên là đèn LED hay là CCFL hả bác?
Nhìn ngon quá bác nhể, mấy con có dáng đèn trước hẹp và có thấu kính tròn tròn như Maz3, Maz6 lắp angel hợp và rất đẹp, con vợ nhà em ngó tới ngó lui coi bộ không xong rồi 
Cái bọn này trình độ kém VN nhiều quá, ai đời bỏ đèn vào lò nướng để tháo keo, sớm muộn gì thì nhiệt độ cũng làm thay đổi chóa đèn
He he, lại chê Tây ngu hơn VN nữa à. Cái xe Mazda3 bên đó chỉ có 13k, thậm chí nếu thằng Tây này mua xe cũ có khi chỉ 3-4 k nó mang về độ tanh banh chơi, như cái đèn này nếu chẳng may hỏng thì nó mua bộ khác thay vào, cần gì phải giữ cái chóa đèn. Với lại tụi nó làm gì có thời gian ngồi xịt đèn khò theo mép đèn cơ chứ. Đổi lại chú Tây này bỏ rất nhiều công sức để giới thiệu qui trình lắp thêm angel eyes rất đầy đủ và dễ hiểu. Cái này nói lên tư duy của tụi Tây khác VN mình, chúng nó không đi vào chi tiết vụn vặt đâu nhé. vote cho chú Tây phát. (y)zippo nói:Cái bọn này trình độ kém VN nhiều quá, ai đời bỏ đèn vào lò nướng để tháo keo, sớm muộn gì thì nhiệt độ cũng làm thay đổi chóa đèn
Vấn đề là nó chỉ để ở nhiệt độ 200 độ và trong khoảng 15 phút. Chắc là chóa đèn chịu được.zippo nói:Cái bọn này trình độ kém VN nhiều quá, ai đời bỏ đèn vào lò nướng để tháo keo, sớm muộn gì thì nhiệt độ cũng làm thay đổi chóa đèn
Ngoài chỗ MK thế nào cũng có chóa bể vứt đi. Bác lấy 1 cái "nấu" thử xem sao?
Thấy nung qua lò nó gỡ ra ngon choét, còn cậy theo cách của Zip thì ôi thôi thôi, chóa bị mẻ nhiều chỗ quá
Thông tin thớt
Đang tải
Chia sẻ:
Bài viết mới
-

-
[Funland] Tập đoàn Trung Quốc muốn tham gia cải tạo khu Thanh Xuân Bắc.
- Started by zaiwaz123
- Trả lời: 17
-
 [Funland] Giá xăng 15h30 chiều nay, đủ cho các cụ tự tịn hô "đầy bình"
- Started by QV.BTM
- Trả lời: 16
-
 [Funland] Vinaphone dạo này thờ ơ với khách hàng nhỉ.
- Started by haiyen1012
- Trả lời: 9
-
[Funland] Các cụ lead đội sale bđs có chuyển đổi số hoặc dùng phần mềm nào cho ae sale không?
- Started by SáttThátt
- Trả lời: 7
-
 [Funland] Nhờ các cụ tư vấn giúp em cái trạm điện đi động
- Started by smallcarvn
- Trả lời: 11
-

-
-
 [Funland] Xin kinh nghiệp các cao nhân OFF xây dựng đôi SALE OFF
- Started by quangminhpro
- Trả lời: 5
-
[Luật] Đề xuất áp thuế xuống 0% cho dầu hỏa và dầu mazut
- Started by QV.BTM
- Trả lời: 1